Guide: Using KeePass – The Basics
What is KeePass?
KeePass is a free and open-source password manager. The application allows for usernames, passwords and other information such as strings and files to be stored in a secure database. Where KeePass differs from many commercial solutions for password management is that it stores these in a single encrypted file rather than utilising anything storage in the cloud.This credential database is secured using a master password.
Why use KeePass?
It is best practice to use a unique username and/or password for each service we create credentials for. This practice prevents a scenario whereby if one service is compromised (e.g. Email) that the same credentials are compromised by virtue of being used for other services (e.g. Online banking). It is also good practice to pick a strong password which would be infeasible for a computer to crack. The problem is that doing this gives an unreasonable amount of credentials to memorise. KeePass allows for the storage of credentials and creation of cryptographically secure passwords meaning that we need only remember the master password. It is also free and open source and so open to scrutiny and comes at zero cost.
I personally use KeePass because I’m too forgetful to remember all of these usernames and passwords and too lazy to manually type them in.
Getting started with KeePass
As stated before KeePass stores the passwords in a database file. If you have multiple devices you may need access to this file from multiple locations. To achieve this you can store the KeePass file on cloud storage such as Google Drive, OneDrive, Dropbox or iCloud.
KeePass Clients
As KeePass is free and open-source there are multiple clients across the different platforms. These are the clients I have used and can personally recommend. Simply install the applications to get started.
- KeePass official Client
- Available for Windows, Linux, MacOS etc here
- This is the official application for KeePass. Be sure to download version 2.X as this has much more features
- If you use this application I’d recommend donating something to keeping the project alive.
- Keepass2Android
- Available from the android app store
- Created by Philipp Crocoll. There are no advertisements with the exception of an annual prompt asking for kind donations.
- Supports a number of cloud locations for the database, autofill integration and fingerprint login.
- If you use this application I’d recommend supporting the project by buying the developer a beer.
Creating the KeePass database
Inside the application choose to create a new database. You’ll then be prompted for the login credentials.
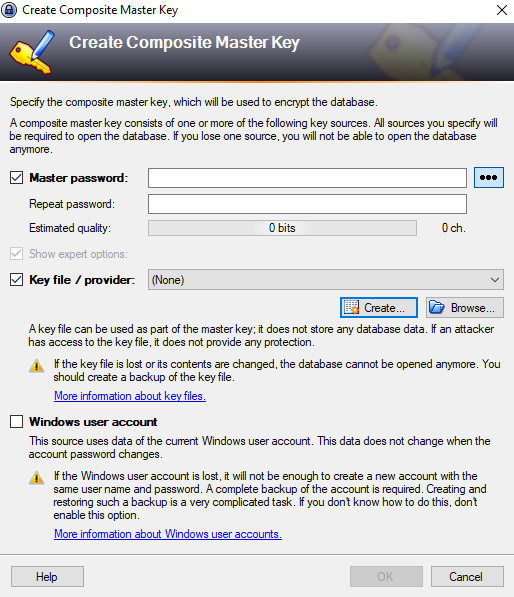
Ensure that you set a strong password as this will protect all of your other passwords. You can also use a key file to provide additional security. Another option is to use your computers login account in place of the authentication. I do not recommend this approach due to the extra risks involved.
In addition to the default settings I recommend making the KeePass database stronger by using the key transformation options. This makes checking the password more computationally difficult and therefore take longer. Before this is enabled we can see how long a guess would take:
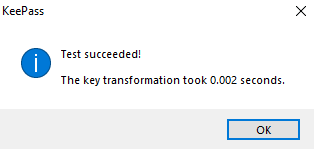
This means a computer could guess 500 passwords per second if it were to try to brute force the password. By selecting 1 second delay it will modify the key transformation such that it takes much longer.
This now means a computer could guess less than 1 password per second and is therefore more resistant to brute forcing. The rest of the default settings are good enough.
There are a number of options in the settings to change how KeePass operates; Things like whether or not it opens on startup, minimizes to the tray or the start menu or default usernames for entries. These are largely personal preference however I’d recommend setting the following options.
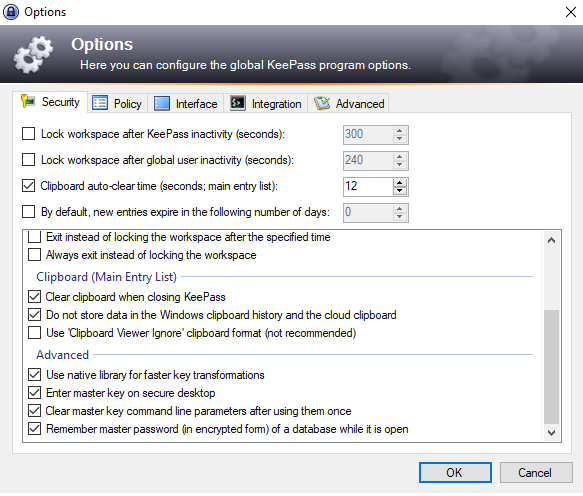
Enable “Enter Master key on secure desktop”. This option uses the secure desktop (like when UAC dims the screen when asking for an admin prompt) when entering your password thereby preventing applications from intercepting the key strokes. The other option I recommend changing is the autotype features.
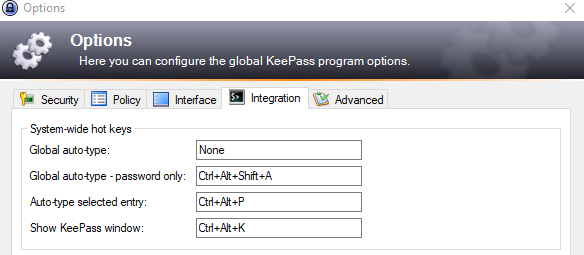
I personally recommend using F4 for Global Autotype and Control + Alt + P for the Autotype selected entry. The auto type feature is something I’ll explore in a later blog post.
Once the KeePass file is created and saved it’s just a matter of pointing whatever client you use to the file wherever the file is and enter the master password.
![]()