KeePass is a free and open-source password manager. The application allows for usernames, passwords and other information such as strings and files to be stored in a secure database. Where KeePass differs from many commercial solutions for password management is that it stores these in a single encrypted file rather than utilising anything storage in the cloud.This credential database is secured using a master password.
Why use KeePass?
It is best practice to use a unique username and/or password for each service we create credentials for. This practice prevents a scenario whereby if one service is compromised (e.g. Email) that the same credentials are compromised by virtue of being used for other services (e.g. Online banking). It is also good practice to pick a strong password which would be infeasible for a computer to crack. The problem is that doing this gives an unreasonable amount of credentials to memorise. KeePass allows for the storage of credentials and creation of cryptographically secure passwords meaning that we need only remember the master password. It is also free and open source and so open to scrutiny and comes at zero cost.
I personally use KeePass because I’m too forgetful to remember all of these usernames and passwords and too lazy to manually type them in.
Getting started with KeePass
As stated before KeePass stores the passwords in a database file. If you have multiple devices you may need access to this file from multiple locations. To achieve this you can store the KeePass file on cloud storage such as Google Drive, OneDrive, Dropbox or iCloud.
KeePass Clients
As KeePass is free and open-source there are multiple clients across the different platforms. These are the clients I have used and can personally recommend. Simply install the applications to get started.
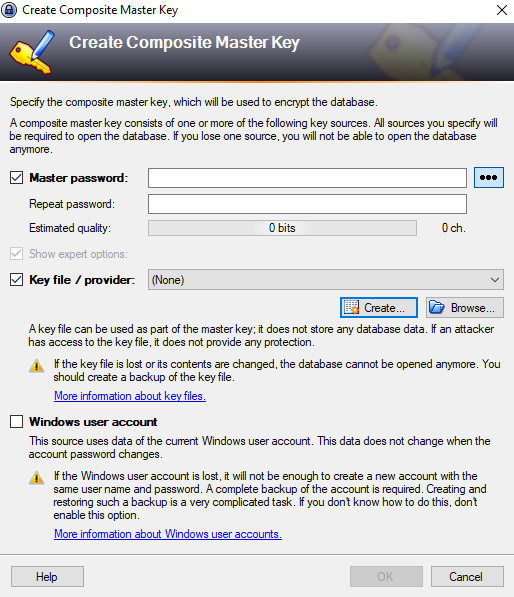
Inside the application choose to create a new database. You’ll then be prompted for the login credentials.
Ensure that you set a strong password as this will protect all of your other passwords. You can also use a key file to provide additional security. Another option is to use your computers login account in place of the authentication. I do not recommend this approach due to the extra risks involved.
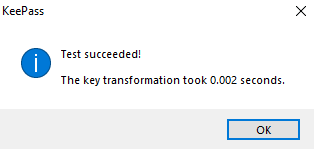
In addition to the default settings I recommend making the KeePass database stronger by using the key transformation options. This makes checking the password more computationally difficult and therefore take longer. Before this is enabled we can see how long a guess would take:
This means a computer could guess 500 passwords per second if it were to try to brute force the password. By selecting 1 second delay it will modify the key transformation such that it takes much longer.
This now means a computer could guess less than 1 password per second and is therefore more resistant to brute forcing. The rest of the default settings are good enough.
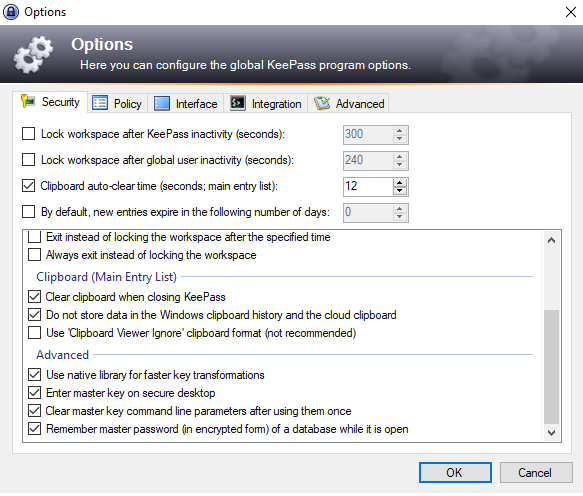
There are a number of options in the settings to change how KeePass operates; Things like whether or not it opens on startup, minimizes to the tray or the start menu or default usernames for entries. These are largely personal preference however I’d recommend setting the following options.
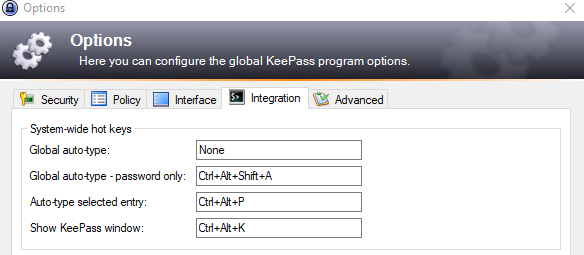
Enable “Enter Master key on secure desktop”. This option uses the secure desktop (like when UAC dims the screen when asking for an admin prompt) when entering your password thereby preventing applications from intercepting the key strokes. The other option I recommend changing is the autotype features.
I personally recommend using F4 for Global Autotype and Control + Alt + P for the Autotype selected entry. The auto type feature is something I’ll explore in a later blog post.
Once the KeePass file is created and saved it’s just a matter of pointing whatever client you use to the file wherever the file is and enter the master password.
Guide: Configuring a Cisco router for BT Ultrafast Broadband (FTTP)
Disclaimer: In no event will I be liable for any loss or damage including without limitation, indirect or consequential loss or damage, or any loss or damage whatsoever arising from loss of data or profits arising out of, or in connection with, the use of this guide. Please ensure you read the full disclaimer before proceeding. By proceeding you confirm you have read and agree to these terms.
PLEASEREAD BEFORE CONTINUING:
If you are a home user; Reconsider using Cisco as a manufacturer for your router. Caution should be taken when considering buying a second hand router. This is due to the new requirement for Cisco Smart licensing which makes it almost impossible to get the correct licenses and support applied to your router if you purchased it second hand.
As Infinity broadband (FTTC/Fibre to the Cabinet) has been common place for several years there are a number of documents out there to describe how to configure a Cisco router for this service. Ultrafast fibre broadband is a new product offered by BT and as such there isn’t a huge amount of information available as it relates to Cisco however BT have produced a SIN documents ( Suppliers’ Information Notes) to describe the FTTP product just as they have done for the FTTC product. As I moved to Ultrafast broadband when it was available and run a Cisco network at home I have attempted to work out how to configure a cisco router for this service and documented it for others.
In order to make things simpler I will break each element into the following segments:
Step 1 – Choosing the right router
Step 2 – Understanding how FTTP is delivered
Step 3 – Intial configuration of the FTTP
Step 4 – Configuration of IPv6
Step 5 – Security hardening of the router
Step 6 – (Optional) BT TV and Multicast
Step 1 – Choosing the right router
For FTTC the most popular cisco VDSL routers were Cisco 880s and 890s. These are hybrid router/switch devices that aren’t quite a router and aren’t quite a layer 3 switch. The Cisco 880 series (e.g. Cisco C887VA) has a limited throughput capability and when certain features are enabled like NAT, Context Based Access Control (CBAC) or VPN tunnels the performance will restrict throughput to around 20-25mbit/s. The Cisco 890 series (e.g. Cisco C897VA) provide more capability however in the same scenario the throughout could be limited to around 130-140 mbit/s.
The speeds offered under BT ultrafast broadband range far exceed this and so throughput becomes an issue. In my opinion there are three possible solutions:
Solution 1: Offload the features which are most CPU intensive (NAT and CBAC) to another device (like a Pfsense firewall) and route all your traffic through it instead or use Pfsense in place of the router entirely.
Solution 2: Use a more capable dedicated Cisco router such as an ISR4000 since a VDSL interface is no longer required.
Solution 3: Use a Cisco 1100 Series ISR. These are the routers designed to replace the Cisco 897 which are now end of sale. I have gone for this option and will be using a Cisco ISR C1111-8P.
Step 2 – Understanding how FTTP is delivered
In order to provide FTTP a fiber must be run from your local fiber enabled cabinet to your home. Usually this involves the ‘removal’ of your current analogue phoneline. In many cases the analogue line will be used as a fish wire to pull the new fiber line into your premises.
The fibre will be terminated into an ONT (Optical Network Termination). This unit used to comprise of two elements. The ONT and the battery backup. It would appear that BT no longer provide the battery backup.
The fiber is terminated into the ONT and the ethernet cable to our router will come from this. It requires a standard plug socket. On my ONT enclosure there is a gap where the battery backup would have went. The ONT also has a BT Plug for a telephone however the normal BT Master socket / NTE5 is still in place and wired for use and so I don’t know if the ONT provides any usable phone connection for now. This also means that you could potentially revert back to FTTC.
The same PPPoE configuration is required for FTTP as was required for FTTC. The dialer interfaces are configured identically.
With FTTC traffic was sent in two ways; Data traffic was sent via vlan 101 and all other traffic (multicast etc) was sent untagged. This is particularly troublesome for BT TV which relies on the multicast traffic for its services. On the FTTC broadband it was recommended that the interface with the BT TV be bridged to the wan interface. In FTTP however all traffic is untagged which presents us a problem for IPTV. This is explored further in step 6. Although the SIN makes reference to a VLAN tag being allocated on a per customer basis; I saw no VLAN tags when a ran a wireshark capture of the WAN connection and so I can only assume the ONT strips these tags off before presenting to us.
The speed promises of Ultrafast can be a little confusing to understand as it will come with a “Guaranteed minimum speed” and a much faster maximum speed. I’m guessing that this is because in practice this is because we have a few different ‘levels’ of bandwidth available. BT SIN506 describes the various ‘levels’ and the behaviour that goes along with them. I suspect that the current consumer offerings from BT relate to one of these and the ‘guarantees’ are the prioritised rate plus the committed burst size:
The table under 2.1.6 of the above document shows various product specifications with a Peak rate (e.g. the advertised max rate for Ultrafast) and the prioritised rate (E.g. The minimum speed guarentee rate). To achive this the service will police to the commited information rate (prioritised) and burst up to the peak information rate. We don’t need to worry about this table as this is the shaping which is occuring from the provider to us.
For the traffic originating from our router (Upstream) the BT SIN has the following to say:
CPs can (optionally) prioritise upstream traffic from the CPE to the ONT by marking their traffic with IEEE 802.1p markings in a VLAN. The GEA-FTTP service supports four upstream queues that are served in strict priority orderCPs can (optionally) prioritise upstream traffic from the CPE to the ONT by marking their traffic with IEEE 802.1p markings in a VLAN. The GEA-FTTP service supports four upstream queues that are served in strict priority order
and here lies the problem with our ability to prioritise our upstream traffic. As the CoS marking is done on the VLAN tag and we know the ONT strips off the VLAN tag there is no mechanism for tagging the traffic as it leave our router. If the service was ordered by a Business there may be a mechanism by virtue of utilising the VLAN tagging.
As an optional step you migh consider shaping the upload of your router to try to avoid TCP Global synchronisation issues withyour FTTP service. I say this is optional because it’s extremely unlikely for you to cause issues unless you’re maxing our the upload speeds.
Step 3 – Intial configuration of the FTTP
The first step in our configuration will be to configure the PPPoE connection so we can authenticate with the providers network. To do this we create a dialer interface with the required parameters and apply it to our WAN interface. With BT connections in general the username and password are largely superficial. With Cisco however we must at least supply a username and password or the router won’t initiate the PPP session. If you have a business connection the details below might work but using the supplied credentials is essential if you want to ensure you have the correct static IPs available. This configuration adjust the MTU values, Enables the CHAP authentication, requests an IP address and a default route.
interface Dialer0
  ip address negotiated
  encapsulation ppp
  ip tcp adjust-mss 1452
  dialer pool 0
  no cdp enable
  ppp mtu adaptive
  ppp authentication chap callin
  ppp chap hostname bthomehub@btbroadband.com
  ppp chap password DoesntMatter
  ppp ipcp dns request
  ppp ipcp route default
Now we want to apply the configuration to secure our device:
Now we need to apply nat overload (PAT) to allow internet access out. First we create an ACL to define the networks that require internet access and then we add the NAT rule and then apply NAT to the interfaces. The vlan is the subnet or subnets you want to provide internet access for.
ip access-list standard Internet-Permitted
  remark == Permit NAT for Internet Access ==
  permit  <network id> <Wildcard mask>

ip nat inside source list Internet-Permitted interface Dialer0 overload

interface Dialer0
    ip nat outside
interface vlan X
    ip nat inside
The final step is to patch the BT ONT to your wan port and configure the port to use the dialer interface.
interface GigabitEthernet0/0/0
  description WAN - FTTP Uplink
  no ip address
  no ip redirects
  no ip unreachables
  no ip proxy-arp
  negotiation auto
  no cdp enable
  pppoe enable group global
  pppoe-client dial-pool-number 1
  no mop enabled
Before you patch the WAN interface you’ll want to complete steps 4 (optional) and step 5 to ensure that your device is properly secured.
Step 4 – Configuration of IPv6
BT provide a /56 subnet for IPv6. What this means is that we have 256 /64 subnets to allocate. The prefix that BT allocate is dynamic just like the IPv4 address and so could change on reboot. The method used to allocate IPv6 addresses to clients is called stateless DHCPv6. Once you have defined your subnet for a network utilising the prefix learned from BT clients use SLAAC to learn of the prefix using NDP and our router will reply with the prefix in a router advertisement. SLAAC requires a /64 in order to perform the autoconfiguration. The client then auto configures the host portion of the IP address. The final step is for DHCPv6 to be used to supply DNS servers to the IPv6 clients.
First we enable ipv6 unicast routing. We can also enable source-route which allows an ipv6 packet to define its route however this is just for diagnostics. We then set a default route for ipv6 to the dialer interace (this isn’t learned like the IPv4 route and define a DHCP pool to hand out the DNS servers for clients.
These two DNS servers are the IPv6 equivilent of Googles 8.8.8.8 and 4.4.4.4 so you can change these for whichever provider you prefer. We then we configure the dialer interface to enable ipv6, request a prefix from BT and configure an IPv6 address based on that prefix.
Rapid commit here just makes the request a much shorter two step process. We then need to configure our VLANs to enable IPv6 and then advertise the prefix for users to autoconfigure. We also need to ensure DNS servers are handed to ipv6 clients.
interface vlan x
  ipv6 address PREFIX-V6 ::<x>:0:0:0:1/64
  ipv6 enable
  ipv6 nd other-config-flag
  ipv6 dhcp server IPv6
PREFIX-V6 tells the interface to use the prefix we learned from BT (the /56) as the base of the /64 address. Set the <x> element to any number between 1 and 255 (0 was used for our dialer interface) and this will define separate /64 subnets. The other config flag lets the clients know they can use DHCPv6 to receive additional configuration and the server command direct the clients to the DHCP pool we created above. Now we are done; The router will learn it’s ipv6 prefix from BT and each client will learn it’s /64 subnet via NDP and autoconfigure using SLAAC. They will also get their DNS servers from DHCPv6.
NOTE: IPv6 heavily relies on ICMP and so the security section will permit this.
Step 5 – Security hardening of the router
Cisco have included a feature called ‘Auto Secure’ for their routers for some time. The feature will ask a series of questions and recommend security configuration based on the answers. I always recommend this as a starting point. Auto secure should be run when all other configuration is done but the internet has yet to be patched in. You may be asked other questions such as whether or not SNMP is used but the output below shows a sample:
FTTP-ROUTER#auto secure
                 --- AutoSecure Configuration ---
 *** AutoSecure configuration enhances the security of
 the router, but it will not make it absolutely resistant
 to all security attacks ***
 AutoSecure will modify the configuration of your device.
 All configuration changes will be shown. For a detailed
 explanation of how the configuration changes enhance security
 and any possible side effects, please refer to Cisco.com for
 Autosecure documentation.
 At any prompt you may enter '?' for help.
 Use ctrl-c to abort this session at any prompt.
 Gathering information about the router for AutoSecure
 Is this router connected to internet? [no]: yes
 Enter the number of interfaces facing the internet [1]: 1
 Interface                  IP-Address      OK? Method Status                Protocol
 GigabitEthernet0/0         unassigned      YES NVRAM  up                    up
 GigabitEthernet0/1         unassigned      YES NVRAM  administratively down down
 GigabitEthernet0/2         unassigned      YES NVRAM  administratively down down
 GigabitEthernet0/3         unassigned      YES NVRAM  administratively down down
 Enter the interface name that is facing the internet: GigabitEthernet0/0
 Securing Management plane services…
 Disabling service finger
 Disabling service pad
 Disabling udp & tcp small servers
 Enabling service password encryption
 Enabling service tcp-keepalives-in
 Enabling service tcp-keepalives-out
 Disabling the cdp protocol
 Disabling the bootp server
 Disabling the http server
 Disabling the finger service
 Disabling source routing
 Disabling gratuitous arp
 Here is a sample Security Banner to be shown
 at every access to device. Modify it to suit your
 enterprise requirements.
 Authorized Access only
   This system is the property of So-&-So-Enterprise.
   UNAUTHORIZED ACCESS TO THIS DEVICE IS PROHIBITED.
   You must have explicit permission to access this
   device. All activities performed on this device
   are logged. Any violations of access policy will result
   in disciplinary action.
 Enter the security banner {Put the banner between
 k and k, where k is any character}:
 k BANNER k
 Enable secret is either not configured or
  is the same as the enable password
 Enter the new enable secret:
 Confirm the enable secret :
 Enter the new enable password:
 Confirm the enable password:
 Configuration of local user database
 Enter the username: username
 Enter the password:
 % Invalid Password length - must contain 6 to 25 characters. Password configuration failed
 Enter the password:
 Confirm the password:
 Configuring AAA local authentication
 Configuring console, Aux and vty lines for
 local authentication, exec-timeout, transport
 Securing device against Login Attacks
 Configure the following parameters
 Blocking Period when Login Attack detected: 360
 Maximum Login failures with the device: 5
 Maximum time period for crossing the failed login attempts: 30
 Configure SSH server? [yes]: yes
 Enter the domain-name: domain.name
 Configuring interface specific AutoSecure services
 Disabling the following ip services on all interfaces:
 no ip redirects
  no ip proxy-arp
  no ip unreachables
  no ip directed-broadcast
  no ip mask-reply
 Disabling mop on Ethernet interfaces
 Securing Forwarding plane services…
 Enabling unicast rpf on all interfaces connected
 to internet
 Configure CBAC Firewall feature? [yes/no]: yes
 This is the configuration generated:
 no service finger
 no service pad
 no service udp-small-servers
 no service tcp-small-servers
 service password-encryption
 service tcp-keepalives-in
 service tcp-keepalives-out
 no cdp run
 no ip bootp server
 no ip http server
 no ip finger
 no ip source-route
 no ip gratuitous-arps
 no ip identd
 banner motd ^C BANNER ^C
 security passwords min-length 6
 security authentication failure rate 10 log
 enable secret 5 $1$VXT6$geedAyQQ8K9M82NkM7Gfa/
 enable password 7 06160E325F1D5D4C
 username username password 7 095C4F1A0A5445415F
 aaa new-model
 aaa authentication login local_auth local
 line console 0
  login authentication local_auth
  exec-timeout 5 0
  transport output telnet
 line aux 0
  login authentication local_auth
  exec-timeout 10 0
  transport output telnet
 line vty 0 4
  login authentication local_auth
  transport input telnet
 line tty 1
  login authentication local_auth
  exec-timeout 15 0
 login block-for 360 attempts 5 within 30
 ip domain-name domain.name
 crypto key generate rsa general-keys modulus 1024
 ip ssh time-out 60
 ip ssh authentication-retries 2
 line vty 0 4
  transport input ssh telnet
 service timestamps debug datetime msec localtime show-timezone
 service timestamps log datetime msec localtime show-timezone
 logging facility local2
 logging trap debugging
 service sequence-numbers
 logging console critical
 logging buffered
 interface GigabitEthernet0/0
  no ip redirects
  no ip proxy-arp
  no ip unreachables
  no ip directed-broadcast
  no ip mask-reply
  no mop enabled
 interface GigabitEthernet0/1
  no ip redirects
  no ip proxy-arp
  no ip unreachables
  no ip directed-broadcast
  no ip mask-reply
  no mop enabled
 interface GigabitEthernet0/2
  no ip redirects
  no ip proxy-arp
  no ip unreachables
  no ip directed-broadcast
  no ip mask-reply
  no mop enabled
 interface GigabitEthernet0/3
  no ip redirects
  no ip proxy-arp
  no ip unreachables
  no ip directed-broadcast
  no ip mask-reply
  no mop enabled
 access-list 100 permit udp any any eq bootpc
 interface GigabitEthernet0/0
  ip verify unicast source reachable-via rx allow-default 100
 ip inspect audit-trail
 ip inspect dns-timeout 7
 ip inspect tcp idle-time 14400
 ip inspect udp idle-time 1800
 ip inspect name autosec_inspect ftp timeout 3600
 ip inspect name autosec_inspect http timeout 3600
 ip inspect name autosec_inspect rcmd timeout 3600
 ip inspect name autosec_inspect realaudio timeout 3600
 ip inspect name autosec_inspect smtp timeout 3600
 ip inspect name autosec_inspect tftp timeout 30
 ip inspect name autosec_inspect udp timeout 15
 ip inspect name autosec_inspect tcp timeout 3600
 ip access-list extended autosec_firewall_acl
  permit udp any any eq bootpc
  deny ip any any
 interface GigabitEthernet0/0
  ip inspect autosec_inspect out
  ip access-group autosec_firewall_acl in
 end

 Apply this configuration to running-config? [yes]:
The problem we will have with this with a modern cisco router is that in later IOS it will still try to apply the CBAC rules even though they’ve been depreciated or completely removed. Zone based firewalls should be used instead. It’s important to remember that zone based firewalls don’t apply to system traffic such as SSH, SNMP or NTP and so these needs locked down with ACLs. The following is a basic zone based setup to get you started. It’s worth noting that ICMP is used heavily for IPv6 and you may need to permit it.
ipv6 access-list ICMPv6-in
   permit icmp any any echo-reply
   permit icmp any any echo-request
   permit icmp any any no-route
   permit icmp any any packet-too-big
   permit icmp any any hop-limit
   permit icmp any any header
   permit icmp any any next-header
   permit icmp any any parameter-option
   permit icmp any any time-exceeded
   deny ipv6 any any

  ipv6 access-list ICMPv6-out
   permit icmp any any nd-na
   permit icmp any any nd-ns
   permit ipv6 any any

 class-map type inspect match-any ICMPv6-inbound
    match access-group name ICMPv6-in
   class-map type inspect match-any ICMPv6-outbound
    match access-group name ICMPv6-out

   class-map type inspect match-any IP-outbound
    match protocol udp
    match protocol tcp

   class-map type inspect match-any ICMPv4-outbound
    match protocol icmp

   policy-map type inspect ToInternet
    class type inspect IP-outbound
     inspect
    class type inspect ICMPv6-outbound
     pass
    class type inspect ICMPv4-outbound
     inspect
    class class-default
     drop

   policy-map type inspect FromInternet
    class type inspect ICMPv6-inbound
     pass
    class class-default
     drop

  zone security inside
  zone security outside
  zone-pair security inside-->outside source inside destination outside
   service-policy type inspect ToInternet
  zone-pair security outside-->inside source outside destination inside
   service-policy type inspect FromInternet

interface dialer 0
 zone-member outside

interface vlan x
 zone-member inside
This config creates two zones; Inside and outside. It allows access out to the internet and reflexive traffic back. Remember to add all your vlans to a zone as by default if two interfaces are in different zones but have no zone pairing their communications will not be permitted. ICMP is a major component of IPv6 and so this configuration permits icmp inbound for IPv6.
Once you’re confident in the security of the router i.e. you have this config completed, have NTP/SNMP/SSH secured with ACLS and your zones configured you can now patch the WAN interface and start using your FTTP broadband.
Step 6 – (Optional) BT TV and Multicast
This part is probably the most frustrating element to dealing with Cisco and the FTTP service. As far as I’m aware there is no way to have a Cisco router function correctly for multicast due to the nature of how BT TV / Youview is delivered. I have however found a very hacky workaround to at least get the BT TV to work.
Your BT TV / Youview set top box will send an IGMPv3 Join message in order to join a multicast stream for whatever IPTV channel you try to visit. The problem is that this IGMP Join message needs to be sent our the WAN interface on your router and not be encapsulated in PPPoE. The following section from a BT SIN explains the behavior
3.2.2.1 IGMP encapsulation IGMP messages intended for the Openreach Multicast service must be sent as IGMP over IP. IGMP messages sent as IGMPoPPPoE will be passed through transparently to the CP and will not be acted on by Openreach. In the case of GEA-FTTP and GEA-FTTC with a white Openreach modem IGMP messages can be tagged with VLAN ID 0 (zero) by the CPE in order to set a preferred 802.1p value upstream. A VLAN tag with an ID of 0 will be removed by the ONT and white Openreach modem but the 802.1p value will be used to ensure the desired upstream scheulding of the IGMP messages on to the PON and VDSL line respectively.
Unfortunately for us Cisco has no method available to forward an IGMP join received on a VLAN directly out a specified interface and therefore avoiding the PPPoE encapsulation. As a result it is not possible to configure a cisco router natively to deal with this setup. With FTTC the story is different because the data is encapsulated in VLAN 101. This allows us to bridge the VLAN with the IPTV with the WAN interface and to configure the PPPoE on the VLAN 101 encapsulated sub interface. With FTTP this isn’t an option as all frames are sent through untagged. As a result the only option available is to physically bridge your connection to the ONT with your routers WAN interface, the IPTV set top box and the interface where the set top box would connect to your switch normally. Hypothetically this bridging shouldn’t lead to any extra risk but just in case I’d suggest putting the IPTV VLAN in a separate security zone.
First we create a new security zone and permit it the same access we have given our inside policy. Creating a new zone ensures the IPTV box can’t communicate with our home network but can reach the internet.
zone security BTTV

zone-pair security BTTV-->outside source BTTV destination outside
service-policy type inspect ToInternet

zone-pair security outside-->BTTV source outside destination BTTV
service-policy type inspect FromInternet
Then we create VLAN for the IPTV box and an interface vlan. Create this as a /30 as you will only have the SVI and the IPTV box. We assign it to this security zone.
vlan 66
  name BTTV
  no shutdown

interface vlan 66
description BT Youview IPTV
  ip address x.x.x.x 255.255.255.252
  ip nat inside
  zone-member security BTTV
  no shutdown
As is stands the IPTV box is isolated but has internet access. It still has no ability to join the multi-cast streams. Now we need to connect up these devices to a dumb switch to bridge the WAN and IPTV box. By doing this the IGMP joins that our IPTV box tries to send out will be sent toward the WAN without being encapsulated in the PPPoE and therefore the Multicast channels will work.
NOTE: Some switches are smarter than others and this can be a problem. The switch i used and can confirm works is a Netgear GS305
1 The BT ONT
2 The WAN port of the ISR (Gi0/0/0 above)
3 The LAN port for the IPTV VLAN (Gi0/1/0 above)
4 The Youview IPTV box
In addition to the configuration the following settings are required on the youview box.
Where the IP address is the one configured for your IPTV VLAN and the DNS server is one of the BT DNS servers. I’ve chosen two of these but you can chose any two from the following list; It just needs to be a BT DNS server:
For some reason the BT wholesale speed tester completely gets the speed for this service wrong. Try any other online speed testing website and ensure the speeds are as expected. If you want to see close to the full 330mbit you need to be directly connected to the LAN and be using the internet at an off peak time. That said I regularly see 220mbit during peak times through a Cisco switch and BT Powerline adapter.
This will show a number of metrics for your IPv6 connectivity. You should get the full 20/20 for this test. If ICMP shows as filtered you may have to permit ICMPv6 through your clients firewall (e.g. Windows Firewall).
Guide: Configuring a Cisco router for BT Ultrafast Broadband (FTTP) – Configuration Only
Disclaimer: In no event will I be liable for any loss or damage including without limitation, indirect or consequential loss or damage, or any loss or damage whatsoever arising from loss of data or profits arising out of, or in connection with, the use of this guide. Please ensure you read the full disclaimer before proceeding . By proceeding you confirm you have read and agree to these terms.
PLEASEREAD BEFORE CONTINUING:
If you are a home user; Reconsider using Cisco as a manufacturer for your router. I cannot recommend Cisco at this time If you’re buying a second hand router. This is due to the new requirement for Cisco Smart licensing which makes it almost impossible to get the correct licenses and support applied to your router if you purchased it second hand.
This is the configuration only guide for configuring a Cisco C1100 series ISR for BT Ultrafast 2 Broadband including IPv6 and BT TV / Youview. The purpose of this post is to list the commands required to configure the device to be used as a reference. The full guide with the commands explained can be found here.
For reference VLAN 1 represents any internal VLANs you have and VLAN 2 represents the Youview IPTV VLAN. Interface GigabitEthernet0/1/0 represents where the Youview box is patched. This is not a complete list of commands required to configure the device; Just the relevant commands.
 ip dhcp excluded-address 192.168.1.1
 !
 ip dhcp pool VL1_LAN
  network 192.168.1.0 255.255.255.0
  dns-server 8.8.8.8 8.8.4.4
  default-router 192.168.1.1
  lease 0 8
 !
 ipv6 source-route
 ipv6 unicast-routing
 ipv6 dhcp pool IPv6
  dns-server 2001:4860:4860::8888
  dns-server 2001:4860:4860::8844
 !
 no cdp run
 !
 class-map type inspect match-any ICMPv6-inbound
   match access-group name ICMPv6-in
  class-map type inspect match-any ICMPv6-outbound
   match access-group name ICMPv6-out
 !
  class-map type inspect match-any IP-outbound
   match protocol udp
   match protocol tcp
 !
  class-map type inspect match-any ICMPv4-outbound
   match protocol icmp
 !
  policy-map type inspect ToInternet
   class type inspect IP-outbound
    inspect
   class type inspect ICMPv6-outbound
    pass
   class type inspect ICMPv4-outbound
    inspect
   class class-default
    drop
 !
  policy-map type inspect FromInternet
   class type inspect ICMPv6-inbound
    pass
   class class-default
    drop
 !
 zone security inside
 zone security outside
 zone security BTTV
 zone-pair security BTTV-->outside source BTTV destination outside
  service-policy type inspect ToInternet
 zone-pair security inside-->outside source inside destination outside
  service-policy type inspect ToInternet
 zone-pair security outside-->BTTV source outside destination BTTV
  service-policy type inspect FromInternet
 zone-pair security outside-->inside source outside destination inside
  service-policy type inspect FromInternet
 !
 interface GigabitEthernet0/0/0
  description WAN - FTTP Uplink
  no ip address
  no ip redirects
  no ip unreachables
  no ip proxy-arp
  zone-member security outside
  negotiation auto
  no cdp enable
  pppoe enable group global
  pppoe-client dial-pool-number 1
  no mop enabled
 !
 interface Vlan1
  description VLAN1 LAN
  ip address 192.168.1.1 255.255.255.0
  no ip redirects
  no ip unreachables
  no ip proxy-arp
  ip nat inside
  zone-member security inside
  ipv6 address IP-V6 ::1:0:0:0:1/64
  ipv6 enable
  ipv6 nd other-config-flag
  ipv6 dhcp server IPv6
  no mop enabled
 !
 interface Vlan2
  description VLAN2 Youview
  ip address 172.16.0.1 255.255.255.252
  no ip redirects
  no ip unreachables
  no ip proxy-arp
  ip nat inside
  zone-member security BTTV
  no mop enabled
 !
 interface GigabitEthernet0/1/0
  description BT TV connection
  switchport access vlan 40
  switchport mode access
  no cdp enable
  spanning-tree portfast
 !
 interface Dialer1
  ip address negotiated
  no ip redirects
  no ip unreachables
  no ip proxy-arp
  ip nat outside
  zone-member security outside
  encapsulation ppp
  ip tcp adjust-mss 1452
  dialer pool 1
  no cdp enable
  ipv6 address IP-V6 ::1/64
  ipv6 enable
  ipv6 dhcp client pd IP-V6 rapid-commit
  ppp mtu adaptive
  ppp authentication chap callin
  ppp chap hostname bthomehub@btbroadband.com
  ppp chap password 7 030A541F140A3059471B1C01
  ppp ipcp dns request
  ppp ipcp route default
 !
 ip nat inside source list Internet-Permitted interface Dialer1 overload
 ip forward-protocol nd
 !
 ip access-list standard Internet-Permitted
  remark == Permit NAT for Internet Access ==
  permit 192.168.1.0 0.0.0.255
  permit 172.16.0.0 0.0.0.3
 ip access-list standard NTP
  remark == Permit NTP clients ==
  permit 10.0.0.0 0.255.255.255
  deny   any
 ip access-list standard SNMPv3
  remark == Permit SNMP monitor ==
  permit 192.168.0.0 0.0.0.255
  deny   any
 ip access-list standard SSH
  remark == Permit SSH access ==
  permit 192.168.0.0 0.0.0.255
  deny   any
 !
 ipv6 route ::/0 Dialer1
 !
 ipv6 access-list ICMPv6-in
  permit icmp any any echo-reply
  permit icmp any any echo-request
  permit icmp any any no-route
  permit icmp any any packet-too-big
  permit icmp any any hop-limit
  permit icmp any any header
  permit icmp any any next-header
  permit icmp any any parameter-option
  permit icmp any any time-exceeded
  deny ipv6 any any
 !
 ipv6 access-list ICMPv6-out
  permit icmp any any nd-na
  permit icmp any any nd-ns
  permit ipv6 any any
 !
 line vty 0 15
  access-class SSH in
  transport input ssh
 line vty 5 15
  access-class SSH in
  transport input ssh
 !
 ntp source Dialer1
 ntp access-group query-only NTP
 ntp master 2
 ntp server 194.80.204.184
 ntp server 195.219.205.9
 ntp server 178.62.250.107
 ntp server 178.79.155.116 prefer
 !
 !
 !
 !
 !
 end
In addition to the configuration the following settings are required on the youview box.