Guide: How to get experience of Palo Alto without physical kit
When studying for the Palo Alto PCSNA exam I had formal training and experience with the PA firewalls themselves. That said; Not all of the PA firewalls I supported used all of the features required for the exam and so self study was essential. Now that I’m beginning my studies for PCSNE I’ve discovered that this not only requires experience of PanOS on the firewalls but also experience of Panorama.
This guide will discuss the options available to someone studying for PCSNA or PCSNE to get some hands on training before sitting the exams.
Palo Alto Learning Centre
Palo alto have an education page explaining the certification process and explaining what resources are available to help you study. The most useful of this is the Learning center. The learning centre provides access to some training courses and training materials however what you get access to is dependent on you or your companies relationship with Palo Alto. Palo Alto partners also get additional learning resouces and courses such as EDU-110. As part of these training courses there are virtual labs available that give access to the physical kit however these courses won’t be available for everyone
Virtual Appliance / EVE-NG
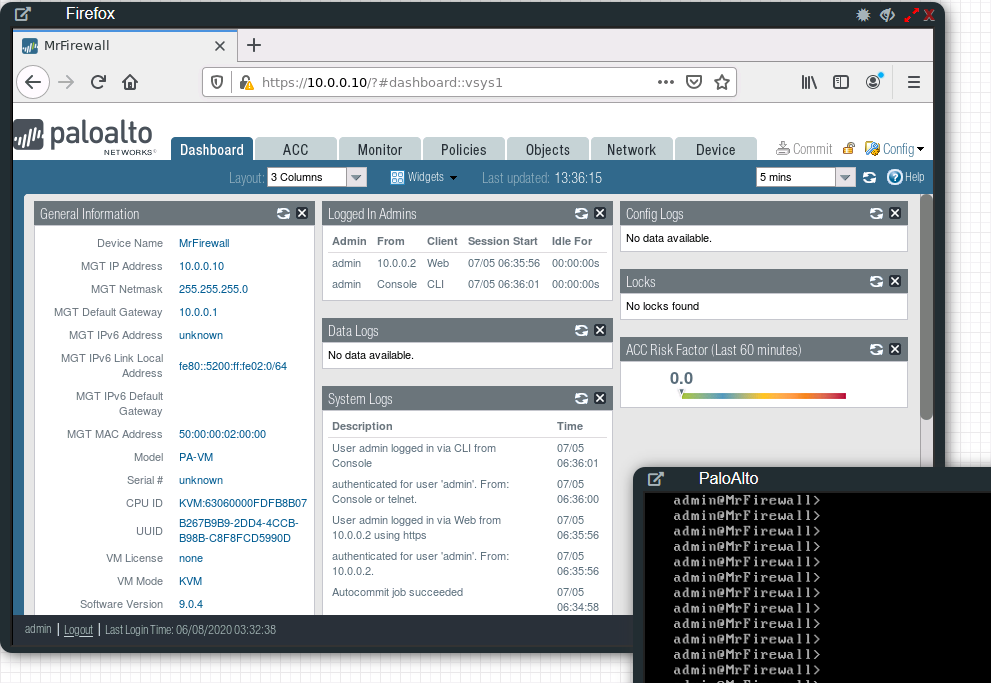
The Palo Alto firewall can be deployed as a virtual appliance in most hypervisors. Even in production these virtual appliances can be utilised. The VM Series appliances can be deployed without being licensed or registered in an ‘evaluation’ type state. This allows us to configure and get used to the GUI/CLI but comes with some major drawbacks. The ‘secret sauce’ of Palo Alto firewalls heavily relies on it’s cloud connected features. These features require licenses. Another drawback is that without the base/throughput license on a Palo Alto firewall we don’t get the monitor logs which makes troubleshooting much more difficult. That said for PCSNA/PCSNE this is a fantastic way to get hands on a real device without any physical hardware. I particularly recommened using EVE-NG to run the PA virtual images in.
EVE-NG is a clientless multi-vendor network emulation platform. Similar to GNS3, It allows us to virtualise a variety of network devices including but not limited to Cisco switches/routers/firewalls and Palo Alto firewalls. This can run on bare metal or on any hypervisor as a VM. It also provides a full HTML5 GUI for interaction meaning that only a web browser is required to use it. It’s very easy to set up and build custom topologies. There exists and free and a professional edition.
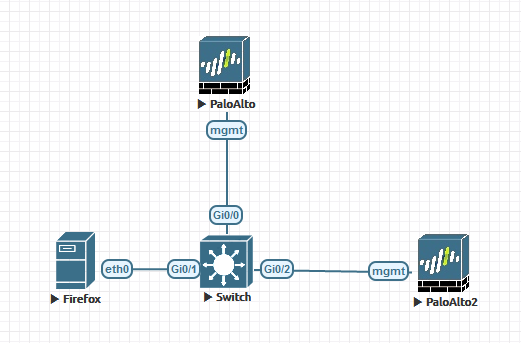
The professional edition costs about £108/$112 per year (at time of writing) for individuals and is definetely worth it if you’re studying for Cisco or Palo Alto certifications. The professional edition provides ‘docker’ based images for things like Web Browsers and Wireshark with makes connecting to the GUI on the Palo Alto firewalls much easier and it also allows for interfaces to be connected/disconnected while the devices are switched on.
AWS / Amazon Web Services
As I illuded to earlier; The secret sauce for Palo Alto comes from it’s cloud based features such as Wildfire/PanDB URL lookups and APP-ID services. These all require licenses to function and so for study the cost of a dedicated device (even with NFR/LAB licenses) may be too high for an individual. Another issue is the requirement for PCSNE candidates to have experience of Panorama as this also requires licensing for the Firewall.
This is where Amazon Web Services comes in. AWS allows us to spin up virtual Palo Alto firewalls or Panorama in an EC2 instance and to pay by the hour for the use of the devices. As well as the EC2 compute/S3 Storage cost for these we also pay a small fee which covers the licensing and subscriptions for the various advanced features. As we only want this for non-production purposes we can lower the EC2 instances resources to the lowest possible to reduce the cost of running.
AWS has in it’s market place the following options for Palo Alto:
VM-Series Next-Generation Firewall Bundle 1 – From $0.87 per hour
- Palo Alto VM Series firewall
- Threat Prevention (IDS/IPS) subscription
- Premium Support
- Panorama subscription
VM-Series Next-Generation Firewall Bundle 2 – From $1.14 per hour
- Palo Alto VM Series firewall
- Threat Prevention (IDS/IPS) subscription
- PanDB URL filtering subscription
- Wildfire
- Global Protect & DNS filtering subscriptions
- Premium Support
- Panorama subscription
Palo Alto Networks Panorama – From $0.19 per hour
- The Panorama server is slightly different in that the license is applied to the firewall so there is only compute costs.
Other virtual machines can also be spun up in AWS and integrated into your topologies for testing. While this method isn’t free it provides a low cost alternative to an NFR (Not for resale) or Lab licensed device. This allows an individual to have access to the full range of Palo Alto capabilities for a small fee. If this were for a team or company I’d suggest getting the NFR or Lab licensed physical kit as this would be cheaper and more effective in the long run.
I intend to put together a guide on building a PCSNE study environment in AWS at a later date.
![]()